iOS安全-切换后台背景模糊

导读
我们在双击切换到后台的时候,背景会有缩略图,而缩略图会暴漏用户的部分敏感数据,所以要求切换到后台后,缩略图需要做毛玻璃模糊处理。一些银行类的应用会要求这么做。比如招商银行。

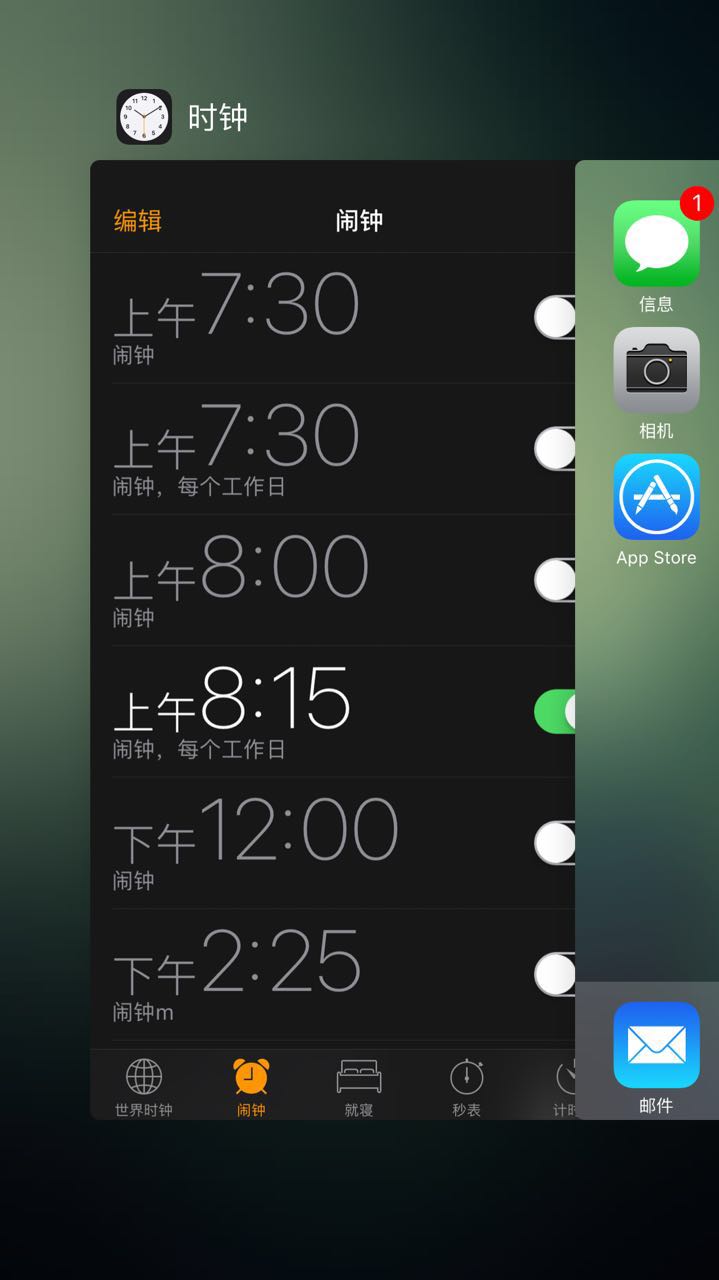
切换到后台效果,可以看到时钟是没有模糊的。

blurry_bg

实现思路也很简单在切换后台前,截取当前页面,然后做高斯模糊,然后加在window上。切到前台前,将这个加的页面移除出去。

关键代码:

1
2
3
4
5
6
7
8
9
10
11
12
13
14
15
16
17
18
19
20
21
22
23
24
25
26
27
28
29
30
31
32
33
34
35
36
37
38
39
40
41
42
43
44
45
46
47
48
49
50
51
52
53
54
55
56
57
58
59
60
61
62
63
64
65
66
67
68
69
70
71
72
73
74
75
76
77
78
79
80
81
82
83
84
85
86
87
88
89
90
91
92
93
94
95
96
97
98
99
100
101
102
103
104
105
106
107
108
109
110
111
112
113
114
115
116
117
118
119
120
121
122
123
124
125
126
127
128
129
130
131
132
133
134
135
136
137
138
139
140
141
142
143
144
145
146
147
148
149
150
151
152
153
154
155
156
157
158
159
160
161
162
163
164
165
166
167
168
169
170
171
172
173
174
175
//
// PAFFBlurryView.m
// Pods
//
// Created by bolei on 16/10/9.
//
//
#import "BLBlurryView.h"
#import <Accelerate/Accelerate.h>
#define kBlurryTag 10009
@implementation BLBlurryView
- (instancetype)initWithFrame:(CGRect)frame blurryView:(UIView *)view {
self = [super initWithFrame:frame];
if (self) {
UIImage *sourceImage = [self getCurrentImageWithView:view];
if (sourceImage) {
UIImage *image = [UIImage imageWithData:UIImageJPEGRepresentation(sourceImage, 1.0)];
UIImage *sImage = [self blurryImage:image withBlurLevel:0.1];
UIImageView *bgView = [[UIImageView alloc] initWithFrame:frame];
bgView.image = sImage;
[self addSubview:bgView];
}
}
return self;
}
+ (void)showBlurryViewInWindow {
UIWindow *window = [UIApplication sharedApplication].delegate.window;
BLBlurryView *view = [[BLBlurryView alloc] initWithFrame:window.frame blurryView:nil];
view.tag = kBlurryTag;
for (UIWindow *window in [[UIApplication sharedApplication] windows]) {
if (window.windowLevel == UIWindowLevelNormal) {
UIView *preView = [window viewWithTag:kBlurryTag];
if (preView) {
[preView removeFromSuperview];
}
[window addSubview:view];
}
}
}
+ (void)removeBlurryViewInWindow {
for (UIWindow *window in [[UIApplication sharedApplication] windows]) {
if (window.windowLevel == UIWindowLevelNormal) {
UIView *view = [window viewWithTag:kBlurryTag];
if (view) {
[view removeFromSuperview];
}
}
}
}
- (UIImage *)getCurrentImageWithView:(UIView *)view
{
UIView *sourceView = view;
if (sourceView == nil) {
sourceView = [self getCurrentVisibleView];
}
if (sourceView == nil) {
return nil;
}
UIGraphicsBeginImageContext(sourceView.bounds.size);
[sourceView.layer renderInContext:UIGraphicsGetCurrentContext()];
UIImage *image = UIGraphicsGetImageFromCurrentImageContext();
UIGraphicsEndImageContext();
return image;
}
- (UIImage *)blurryImage:(UIImage *)image withBlurLevel:(CGFloat)blur {
if (blur < 0.f || blur > 1.f) {
blur = 0.5f;
}
int boxSize = (int)(blur * 100);
boxSize = boxSize - (boxSize % 2) + 1;
CGImageRef img = image.CGImage;
vImage_Buffer inBuffer, outBuffer;
vImage_Error error;
void *pixelBuffer;
CGDataProviderRef inProvider = CGImageGetDataProvider(img);
CFDataRef inBitmapData = CGDataProviderCopyData(inProvider);
inBuffer.width = CGImageGetWidth(img);
inBuffer.height = CGImageGetHeight(img);
inBuffer.rowBytes = CGImageGetBytesPerRow(img);
inBuffer.data = (void*)CFDataGetBytePtr(inBitmapData);
pixelBuffer = malloc(CGImageGetBytesPerRow(img) *
CGImageGetHeight(img));
if(pixelBuffer == NULL)
NSLog(@"No pixelbuffer");
outBuffer.data = pixelBuffer;
outBuffer.width = CGImageGetWidth(img);
outBuffer.height = CGImageGetHeight(img);
outBuffer.rowBytes = CGImageGetBytesPerRow(img);
error = vImageBoxConvolve_ARGB8888(&inBuffer,
&outBuffer,
NULL,
0,
0,
boxSize,
boxSize,
NULL,
kvImageEdgeExtend);
if (error) {
NSLog(@"error from convolution %ld", error);
}
CGColorSpaceRef colorSpace = CGColorSpaceCreateDeviceRGB();
CGContextRef ctx = CGBitmapContextCreate(
outBuffer.data,
outBuffer.width,
outBuffer.height,
8,
outBuffer.rowBytes,
colorSpace,
kCGImageAlphaNoneSkipLast);
CGImageRef imageRef = CGBitmapContextCreateImage (ctx);
UIImage *returnImage = [UIImage imageWithCGImage:imageRef];
//clean up
CGContextRelease(ctx);
CGColorSpaceRelease(colorSpace);
free(pixelBuffer);
CFRelease(inBitmapData);
CGColorSpaceRelease(colorSpace);
CGImageRelease(imageRef);
return returnImage;
}
- (UIView *)getCurrentVisibleView {
UIWindow *window = [[UIApplication sharedApplication].delegate window];
UIViewController *rootViewController = window.rootViewController;
if ([rootViewController isKindOfClass:[UINavigationController class]]) {
return ((UINavigationController *)rootViewController).visibleViewController.view;
}
return rootViewController.view;
}
/*
// Only override drawRect: if you perform custom drawing.
// An empty implementation adversely affects performance during animation.
- (void)drawRect:(CGRect)rect {
// Drawing code
}
*/
@end

逻辑并不复杂,主要麻烦的点在于什么时候调用,切到后台涉及到四个周期:

  • applicationWillResignActive 失去焦点的时候会首先调用
  • applicationDidEnterBackground 切换到后台后调用。在WillResignActive之后调用
  • applicationWillEnterForeground 将要回到前台的时候调用
  • applicationDidBecomeActive 已经到前台后调用

其中点击home,切换到后台,四个状态都会调用。但是双击home的话只会调用applicationWillResignActive和applicationDidBecomeActive

一般调用显示和消失需要成对调用。所以两个方案:

  • 方案1:applicationWillResignActive调用消失,然后applicationWillEnterForeground调用显示
  • 方案2:applicationDidEnterBackground调用消失,然后applicationDidBecomeActive调用显示

方案1的问题是:在调用applicationWillResignActive,需要截屏需要做模糊效果,如果这个调用时间过长,就不会显示模糊的效果,对于复杂的页面经常会出现这个问题,需要找更好的算法去解决,目前没找到好的方案。而且进入到APP会有比较久的时间的模糊效果。

方案2的问题是:在双击home的时候,这个模糊效果不会生效。相对来说更推荐方案二。

坚持原创技术分享,您的支持将鼓励我继续创作!